When you have that first discussion with a client about an upcoming project what is it that they are talking to you about? Is it their vision for the project, how it will look and feel? Perhaps it is questions surrounding that bespoke kitchen they want you to incorporate or maybe it is how many units you will need to fit on the site to meet their profit margins… chances are a topic that won’t come up is the drainage, because let’s face it, drainage isn’t sexy right?
After a short break, the Rennard Consulting Blog is back and we are starting a new series about the importance of early drainage design, demonstrating how it is potentially one of the most critical elements within a development and why having those early discussions is vital to getting projects off to the best possible start.
This week we are looking at planning, and this post will cover the three steps you should be taking during the early design process, finding out about the various stages of planning, before having a brief look at some of the most commonly requested drainage documents.
So, let’s get started.
Why you cannot construct the roof before the walls
When you get your hands on a site it can be tempting to just crack on with the design, after all, it is the building that is usually the vision, with people tending to request a new office block, school or museum. To make that building work, however, it is going to need infrastructure, and while most Mechanical and Electrical components can be installed to meet the majority of layouts, the drainage can sometimes be a little bit trickier.
The key here is the five P’s ‘Proper Planning Prevents Poor Performance’ and it may come as no surprise to you that this philosophy is crucial to getting your drainage project off to the best possible start.
To try and simplify this early process, there are three simple steps which you can follow and are briefly detailed below.
Step 1 – Site investigation
As soon as you start looking at a site, it is important to think about the implications in terms of flood risk and drainage.
This could include your friendly drainage engineer undertaking a site walkover, particularly if it is raining, to see what is on the site and where water is naturally collecting, looking at the site’s proximity to rivers and watercourses and reviewing the visual condition of any existing drainage assets.
At this point, they could also do a desktop review of any existing information you may have and begin to advise you where best to locate the various components of the project to suit the drainage requirements.
Figure 1: Site investigation

Step 2 – Data Collection
The next step is to do a data collection exercise, where your engineer may scope out additional surveys which might be required to plug any gaps. These can include things such as:
- Utilities and drainage surveys which will help you confirm what is already on the site.
- CCTV Surveys which will establish the condition of any existing assets.
- Soakaway tests which will determine the permeability of the ground and establish if infiltration can be used as a method of discharge. Evidence of these is increasingly being requested as part of planning applications.
At this point, your drainage consultant might also put in a request to the local water authority for copies of the sewer records as this allows them to find out where any adoptable assets are located.
Finally, they might begin to have discussions with the Lead Local Flood Authority to see what their requirements are in terms of the planning process.
Step 3 – Planning Application
Once all possible data has been gathered and you and your client have had a chance to review it the final step is for you to collate the drainage aspects of the planning application. The extent of what will be required will depend on the site and the requirements of your local planning officer.
You can, of course, try to jump straight to Step 3 and proceed based on the assumptions, but in reality, this is like trying to construct the roof of your developments before you have the walls in place, it is possible, however, you will cause yourself a whole lot of issues and challenges later on down the line.
Figure 2: Planning Application

The five stages of planning?
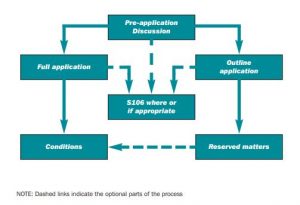
People often use the term, ‘submitting a planning application’, but did you know that there are five different stages and which stage you are at will depend on the amount of information you will need to provide.
Figure 3: Summary of the planning process

Source: https://www.susdrain.org/files/resources/other-guidance/lasoo_non_statutory_suds_technical_standards_guidance_2016_.pdf
So, what are the five stages? Well in summary they are:
- Pre-app – the pre-app stage provides an opportunity to have early discussions with relevant stakeholders and highlight what the potential challenges could be in getting your application approved. While most people see this as a barrier and therefore try to minimise engagement, by having early discussions you can make the whole process a lot quicker by ensuring that problems are identified and dealt with early as possible as opposed to at the last minute when they can become time-critical on the project.
- Outline – Outline planning permission seeks to establish whether the size and type of the project would likely be acceptable to the local planning authority. Again, it is a chance to highlighted any issues and check the feasibility of a development before investing too much time in the detailed design process.
- Full – for a full application you will need to provide a detailed proposal for approval of how your site is going to be developed. If an application is granted without any conditions, then you do not need to engage further with the planning officer so spending some time getting your application right and ensuring it meets all the requirements is vital.
- Reserved – Reserved matters are parts of a proposed development which you can choose not to submit details for and as a result, they are ‘reserved’ for a later date. These can include things such as access, landscaping, layout and size. It is important to note, however, that you must close out any reserved matter within 3 years of the outline planning application being granted.
- Discharge – Sometime a planning application will be approved with conditions that will need to be discharged. The only way to close out these conditions is to provide any supporting information and request in writing for their approval. Again it should be noted that the local planning authority will charge a fee for undertaking this work so it is often best to ensure those early discussions take place to minimise the number of conditions that could be attached to your application.
Preparing your planning application, why it is more than just a Flood Risk Assessment
When most people approach us to prepare a planning application the document they generally ask for is a Flood Risk Assessment. While this is your secret weapon when it comes to determining the flood risk of their site, it should not be seen as a just another tick boxing exercise.
When completed in full an FRA will provide an overview of the site and proposed development, review potential sources of flooding, identify a preferred method of discharge and determine an outline drainage strategy…but its potentially not the only thing you will need to provide.
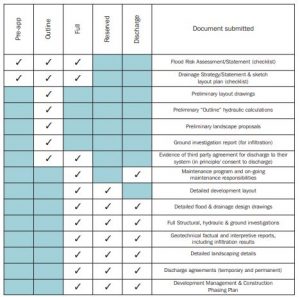
The Local Authority SuDS Officer Organisation (LASOO) in their Non-Statutory Technical Standards for Sustainable Drainage report (https://www.susdrain.org/files/resources/other-guidance/lasoo_non_statutory_suds_technical_standards_guidance_2016_.pdf), provides a great summary table of the type of documents that you may need to submit for the various planning stages.
Figure 4: Summary of key documents required at different stages

Source: https://www.susdrain.org/files/resources/other-guidance/lasoo_non_statutory_suds_technical_standards_guidance_2016_.pdf
It shows that a Flood Risk Assessment and drainage strategy are the minimum you need to provide and will only get you to Pre-App stage. For a full application, the list is much more extensive with Local Authorities even asking for additional information on top of this which can include:
- Exceedance plan
- Impermeable Area Plan
- Maintenance Strategy
- Sustainable Drainage Systems Proforma.
We will be looking at some of these documents in more detail in future posts but for now, it is just important that you know that they exist and may be required to get you your planning permission.
Summary
So, in summary, we have seen why it is important to spend a little bit of time at the start of the planning process getting to know your site, the challenges you might face and what your planning requirements might look like at the various stages.
Going into the process informed will help you reduce cost and time on your project and ensure that you go into the detailed design phase feeling comfortable that your project can go ahead with minimum issues.